Setting up Authorize.Net
Authorize.Net allows you to choose between its merchant account + payment gateway plan or its Payment Gateway only plan.
Please reach out to us @ [email protected] to help you setup if you are not sure which one would be the best for you.
Choosing Authorize.Net
Consider the following factors before choosing Authorize.Net as a payment solution:
- Countries : Authorize.Net is currently available for companies based in the United States of America, Canada, the United Kingdom, Europe, and Australia.
- Payment Methods: Authorize.Net supports almost all major credit and debit cards such as Visa, MasterCard, American Express, Discover, Diner's Club, JCB, and so on.
- Pricing: Authorize.Net has service fees which include, setup, monthly and per-transaction fees. More details about pricing here.
ACH payments
Authorize.Net also supports ACH payments along with credit card
To be able to accept ACH payments using PayorCRM ,
- You must be a US based merchant selling to customers in the US.
- You must have an Authorize.Net account configured in PayorCRM
- Your account must be enabled for eCheck.Net processing by Authorize.Net
- To use eCheck.Net you must submit the eCheck.Net application and undergo an underwriting process.
Configuring Authorize.Net with PayorCRM to accept Credit card and ACH payments
Follow the steps to configure Authorize.Net to accept Credit card and ACH Payments
Step 1 : On the left menu in PayorCRM click on settings
Step 2 : Under Accounts Setting > Under Pay with Credit card > Select the Processor as Authorize.Net
Step 3: Click on Active Check Box and enter the Authorize.Net Login ID and Authorize.Net Transaction key

Step 4 : Click on Save
Step 5 : To setup ACH payments under Pay with Bank to Bank Transfer > Select the processor as Authorize.Net and enter the login Id and transaction key as above
API Login Id - The API Login Id can be found in your Authorize.Net Merchant Interface under Account > Settings > Security Settings > API Login ID and Transaction Key.
Transaction Key - The Transaction Key can be obtained by providing the Secret Answer to your Secret Question. Once you have that in place, copy the Transaction Key and enter it in PayorCRM.
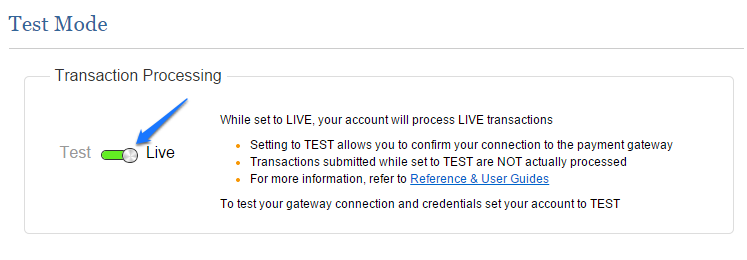
Turn off Test Mode
Authorize.Net has a test mode in its production account which lets you test your connection with the payment gateway without carrying out actual charges. By default, your payment gateway account is set to "Test Mode". To carry out live transactions, ensure your Live Mode is turned on. To do this, in your Authorize.Net account, navigate to Account > Settings > Security Settings > General Security Settings and set the mode to Live as shown below: